How to Install
Curtains
NOTE: our acoustic curtains are heavier than non-acoustic curtains. Unless you are experienced with curtain installations, and physically fit, we do not recommend you install our acoustic curtains.
The instructions below are a guide only. There are other considerations based on your situation.
Acoustic Blinds and Curtains takes no responsibility for self installations.
Step 1:
First of all, ensure your hands are clean as you unpack your order and lay it out in front of the window where the curtain is being installed. Lay your track near your window to check the width and make note of where it will be installed.
The brackets will fix your curtain to the face of the window (face fitting) or the ceiling (top fitting), depending on what you selected when you placed your order. All brackets will be included inside your track packaging.
You will need the following tools:
- a step ladder (this is recommended for high installations)
- a tape measure (we recommend a metal tape measure)
- a cordless drill (a hammer drill is required for brick, concrete or masonry fixings)
- appropriate drill bits
- appropriate screws
- a pencil/marker
- protective eye and hearing wear
Step 2:
Check how many brackets you need for your track width. Lay out the brackets next to your track and space them 400mm apart. If possible you should fix into studs - which are typically 600mm apart.
It’s important that on the ends of the curtain track the first/last brackets are fixed no more than 75mm from the end of the track otherwise the track may bend once the curtain has been attached.
Aesthetically we recommend that brackets are equal distance apart. You should calculate this based on your track width and stud position before marking screw positions.
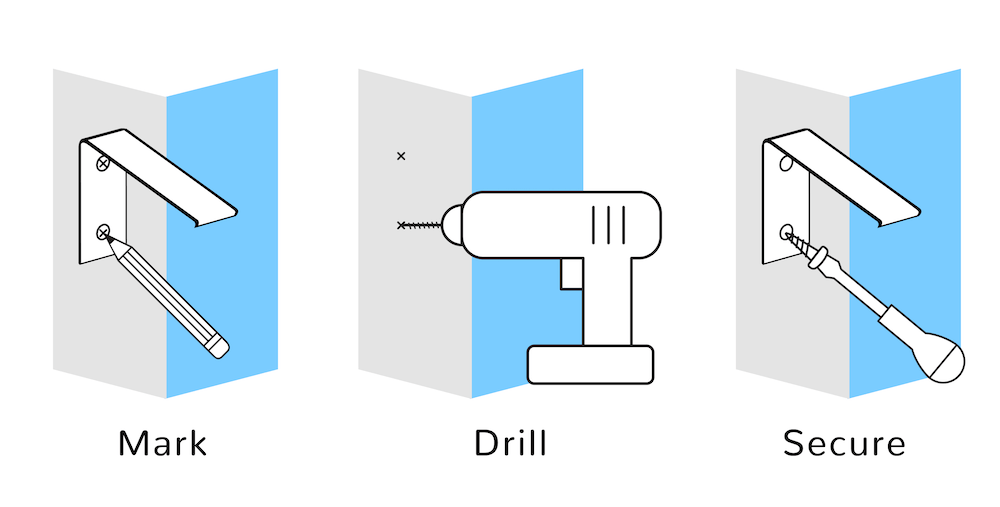
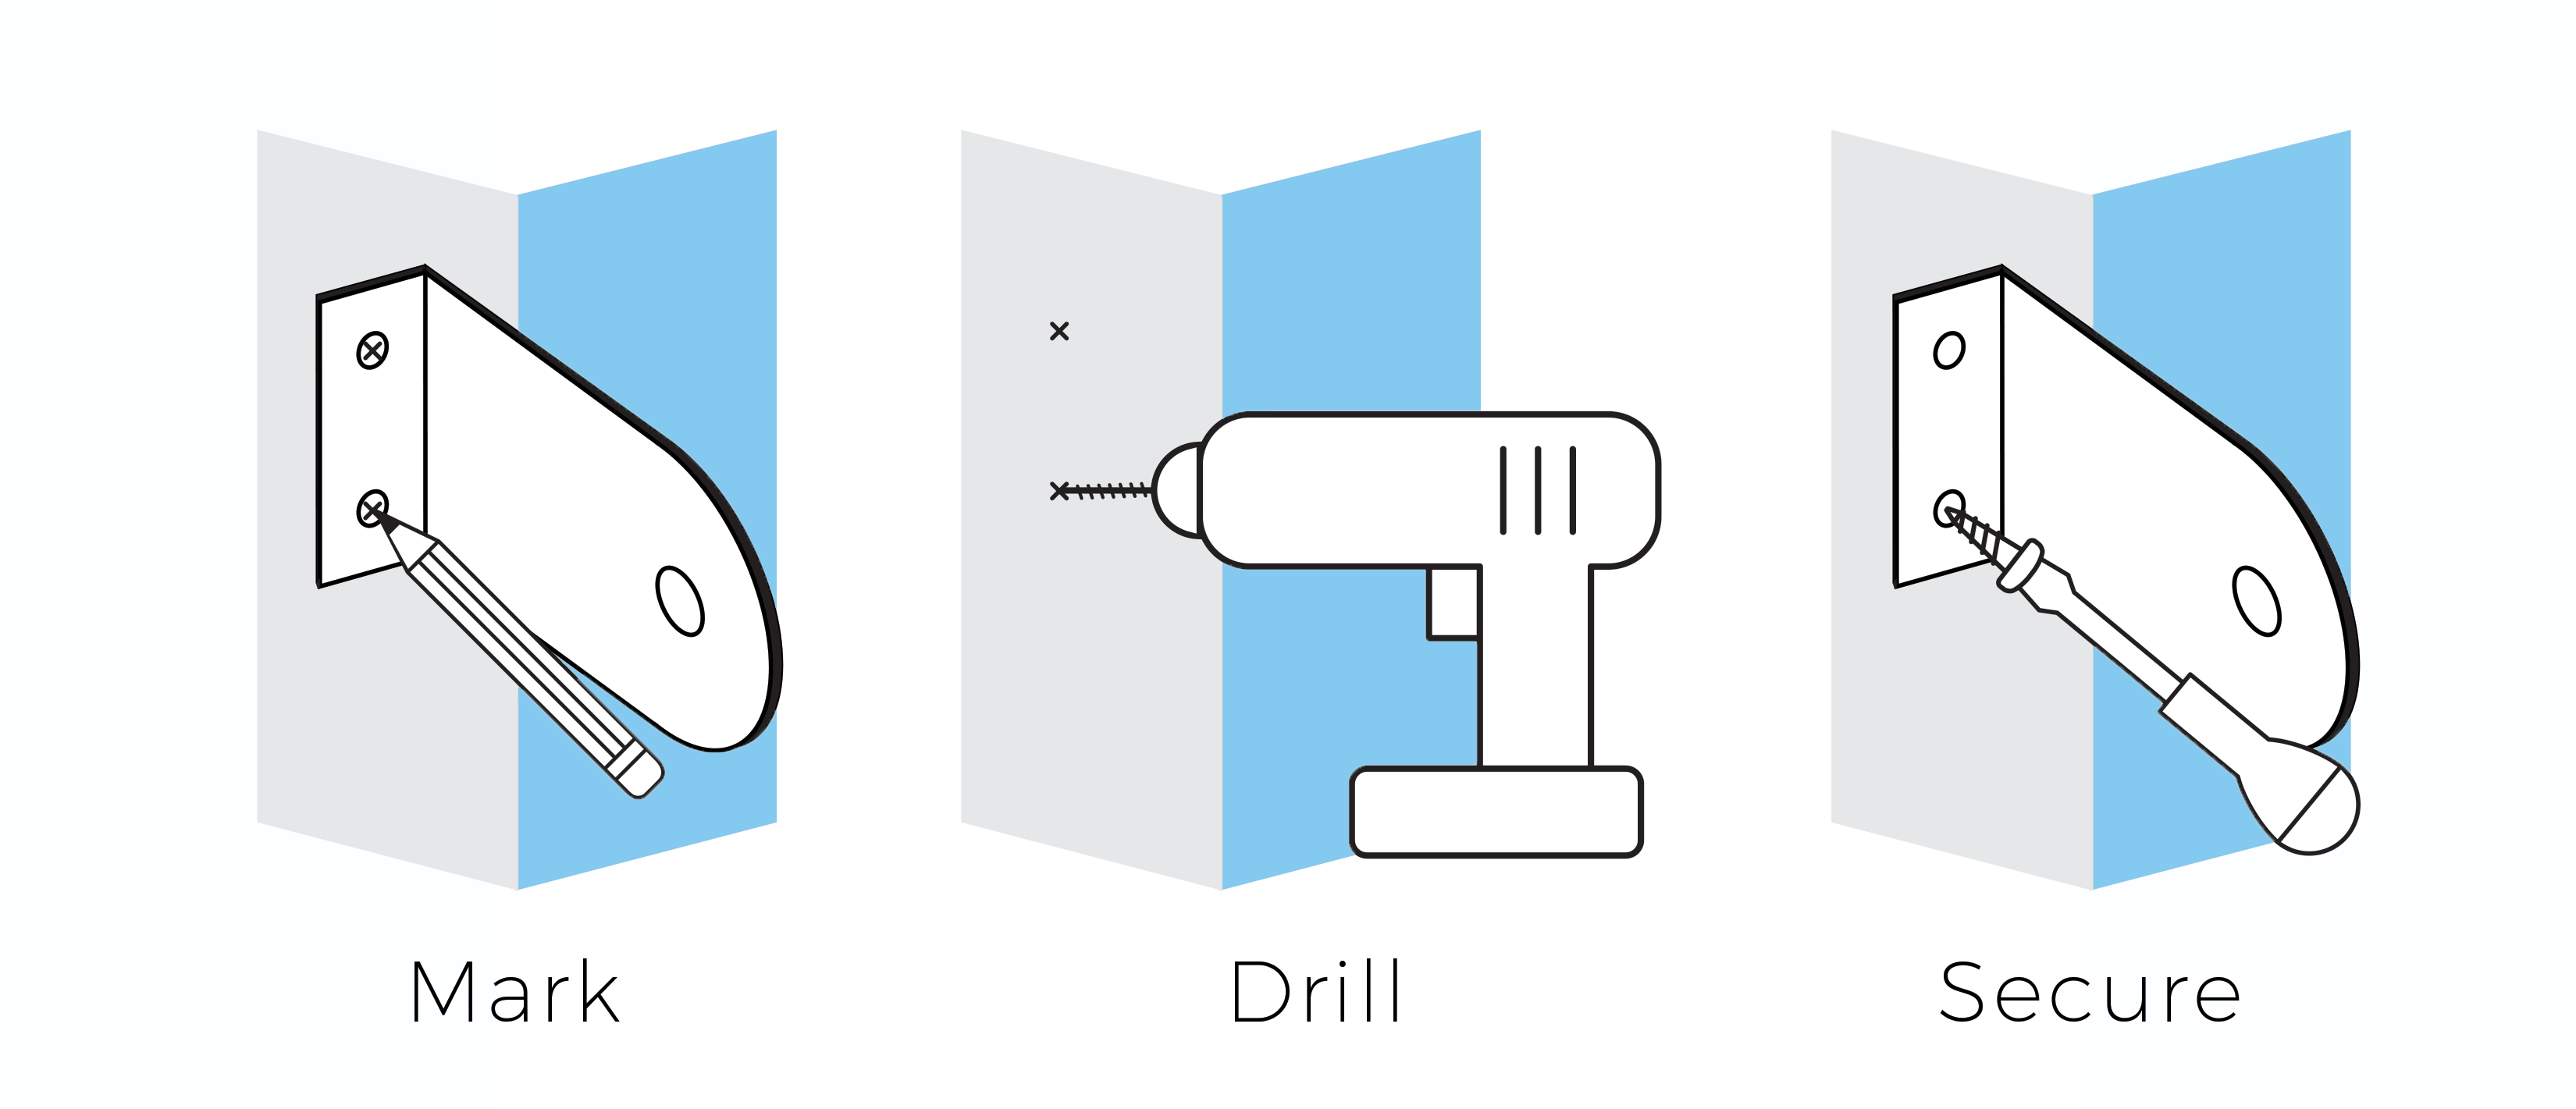
Mark where your pilot holes will be by placing the brackets against the wall where you want it to go and use a pencil to mark where you will be inserting the screws.
A reminder that the drop measurements that have been provided are from the top of the track to the floor (or ceiling to floor for top fix). Therefore please note that the curtain fabric drop itself will be smaller than the measurements provided.
When marking your drill holes, we suggest allowing a minimum 15mm gap at the floor for the curtains to drop.
For 2 or more pieces of track, you'll also need two brackets on either side of the track joiner(s). Lay out these brackets at least 100mm apart.
Drill pilot holes for timber screws or appropriately sized holes for your plasterboard anchors or masonry plugs. If you're drilling into plasterboard, you have two options:
1. Use a stud finder to locate where your wall studs are, then follow the steps below.
2. Use appropriately sizes Ramset Hollow Wall Anchors, which will help secure your curtains to plaster. Please note that we suggest against using the ‘Wall Mates’ plasterboard anchors to fix your brackets to the wall or ceiling. These have been known to come away from the plasterboard once weight is applied to them.
If you're drilling into concrete, stone, brick or tile, use a hammer drill and appropriate drill bits, plugs, anchors and screws.
PLEASE NOTE: the brackets must be level. Use a level to confirm when you mark your pilot holes, and again after you screw the brackets into place.
Step 3:
Screw your brackets into place without the track attached to the bracket. You can leave the track on the floor.
Once the brackets have been screwed into place, connect the track to the brackets by loosening the small screw in each bracket. Pick up your track and click it into each bracket. For our standard track, tighten the small screw on each bracket to fix the track into position and check that the track is secure. For the heavy duty track you will notice that both the face fix (wall) or top fix (ceiling) brackets have a small metal piece which fixes the bracket into place. Release the screw that tightens this small metal piece, insert the track and then tighten.
Step 4:
You are now ready to hang your curtains.
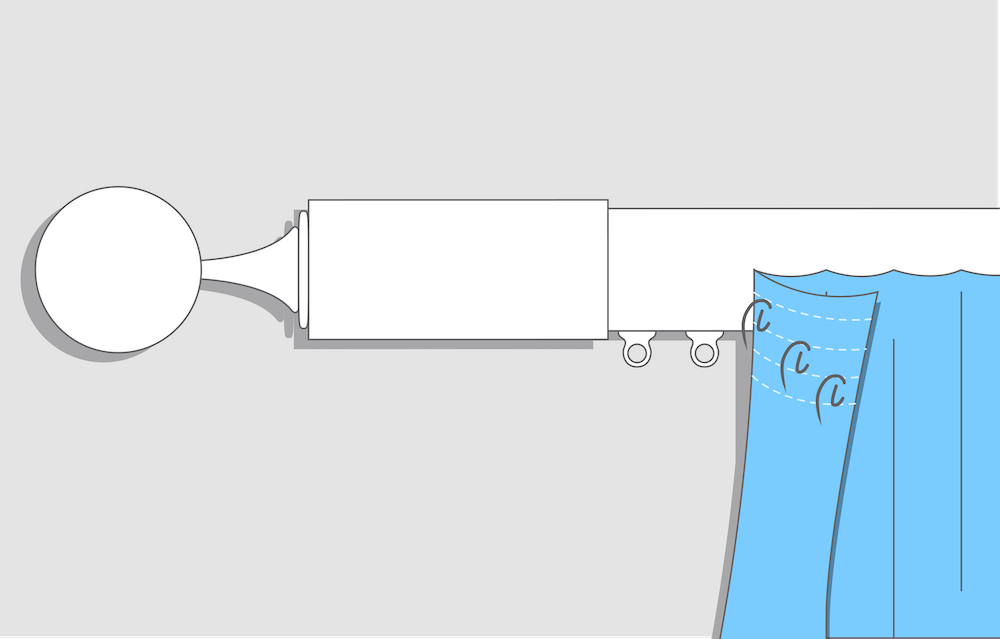
The track will come with runners already inserted and the curtain will have the small pendants already attached to the curtain heading. Pick up the curtain and click each pendant into your track, starting at one side. You should hear a click as the pendant clicks secure into the corresponding track runner. Be sure not to miss any pendants.
Make the S shape as you go, by folding the fabric alternately forwards then backwards. Starting at the top, ensure the heading is shaped as an S. Once you’ve dressed the heading, you can start to dress the body of the curtain. Work sequentially from one side of the curtain to the other, ensuring each S fold follows from the top of the curtain to the bottom of the curtain when they’re drawn open.
Step 5:
Test the curtain by opening and closing it a couple of times.
If you're curtain track is not running smoothly, you can apply silicon lubricant spray to lubricate the track. Open your curtains all the way, then apply a thin layer of silicon spray onto the tracks, especially where the pendants slide across. Take care not to spray your curtain fabric.
If you’re unsure on any of the points listed above or have any questions at all, please don’t hesitate to contact us. We can arrange a phone or video call with one of our experienced installers if required.
Blinds
Step 1:
Unpack your order and lay it out in front of the window where the blind is being installed.
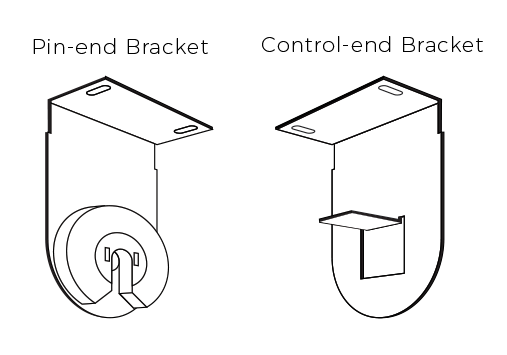
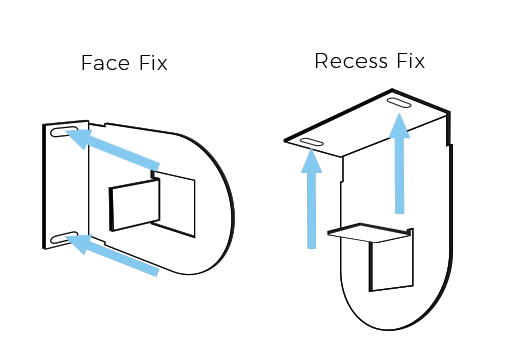
You should have two different brackets, a pin-end bracket and a control-end bracket. The control-end bracket must be on the side that you want the chain control. The brackets will fix your blind to the face of the window (face fitting) or the top of the window recess (recess fitting), depending on what you selected when you placed your order.
Step 2:
Mark where your pilot holes will be by placing the bracket against the wall where you want it to go and use a pencil to mark where you will be inserting the screws. Drill pilot holes for timber screws or appropriate sized holes for your plasterboard anchors or masonry plugs. If you are using anchors or plugs, once you have drilled appropriate size holes you will need to gently tap them into the plasterboard or concrete/brick first. Screw the bracket into place. Complete the process for both sides.
PLEASE NOTE: the brackets must be level. Use a level to confirm when you mark your pilot holes, and again after you screw the brackets into place.
Step 3:
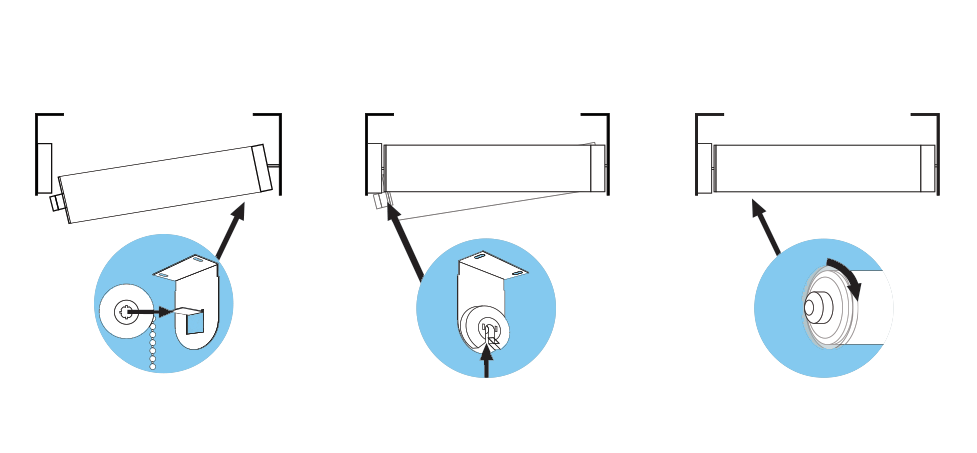
Once the brackets have been screwed into place, locate the control end of the blind (the end with the chain control) and insert it into the control-end bracket. Position the blind so that the chain hangs freely and will not rub on the chain cover when you raise and lower your blind. Turn the plastic cover on the pin end of the blind anti-clockwise to retract the pin, slot the pin into the notch on the pin end bracket, and then turn the plastic cover clockwise to extend the pin and lock the blind in place.
PLEASE NOTE: ensure that the blind is rolled up when fitting the blind into the brackets.
Step 4:
PLEASE READ THE FOLLOWING POINT REGARDING CHILD SAFETY:
All blinds include a child safety device which must be used. In Australia this is required by law.
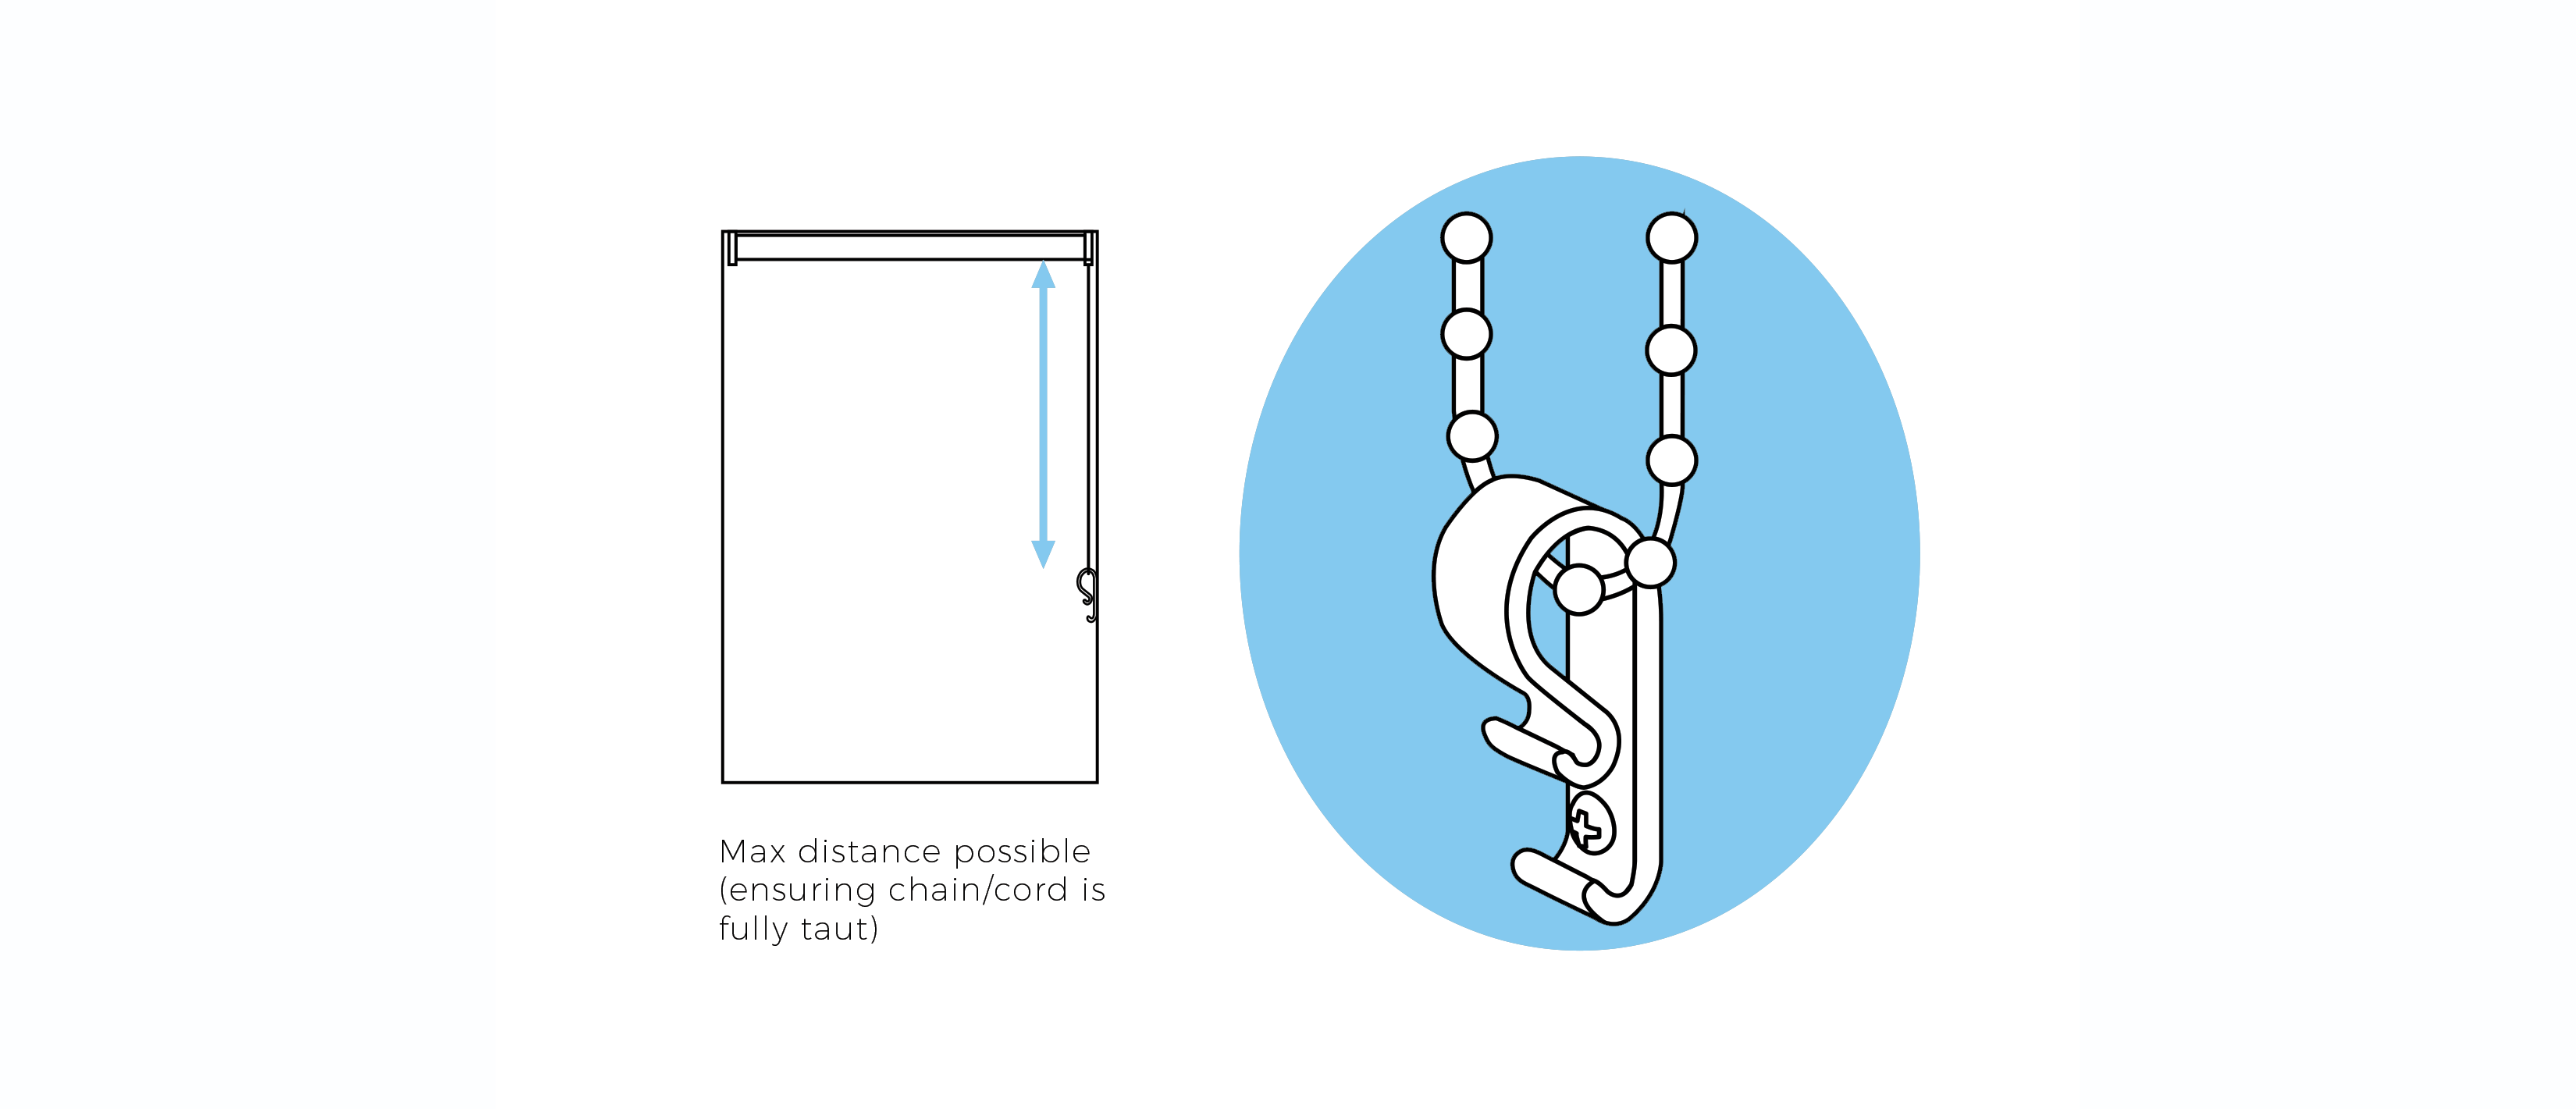
When attaching the chain safety device, allow the chain to drop to its natural height and screw the child safety device to the wall or frame under a small amount of tension. It is important that once fixed the chain is reasonably taut.
For more information visit the ACCC’s webpage on the installation of corded internal window coverings.
Step 5:
Test the blind by lowering and raising it a couple of times.
Congratulations, you have successfully installed your blind!